安装matplotlib
-
更新pip工具(已更新可跳过
1
| pip install --upgrade pip
|
-
安装
1
| pip install matplotlib -i https://pypi.tuna.tsinghua.edu.cn/simple
|
-
查看版本
绘制简单折线图
1
2
3
4
5
6
7
8
|
import matplotlib.pyplot as plt
squares = [1,4,9,16,25]
plt.plot(squares)
plt.show
|
修改标签文字和线条粗细
1
2
3
4
5
6
7
8
9
10
11
12
13
14
15
16
17
|
import matplotlib.pyplot as plt
squares = [1,4,9,16,25]
plt.plot(squares,linewidth=5)
plt.title("square number",fontsize=24)
plt.xlabel("x_value",fontsize=14)
plt.ylabel("y_value",fontsize=14)
plt.tick_params(axis='both',labelsize=14)
plt.show()
|
校正图形
总所周知,数组第一个对应的索引是0,也就是说在我们这个例子里0对应1,所以需要矫正
1
2
3
4
5
6
7
8
9
10
11
12
13
14
15
16
17
18
19
20
|
import matplotlib.pyplot as plt
x_values = [1,2,3,4,5]
squares = [1,4,9,16,25]
plt.plot(x_values,squares,linewidth=5)
'''标题取名取中文名不显示,尽量取英文'''
plt.title("square number",fontsize=24)
plt.xlabel("x_value",fontsize=14)
plt.ylabel("y_value",fontsize=14)
plt.tick_params(axis='both',labelsize=14)
plt.show()
|
使用scatter()绘制散点图并设置其样式
1
2
3
4
5
|
import matplotlib.pyplot as plt
plt.scatter(2,4)
plt.show()
|
下面来添加样式
1
2
3
4
5
6
7
8
9
10
11
12
13
14
15
|
import matplotlib.pyplot as plt
plt.scatter(2,4,s=200)
plt.title("square number",fontsize=24)
plt.xlabel("x_value",fontsize=14)
plt.ylabel("y_value",fontsize=14)
plt.tick_params(axis='both',which='major',labelsize=14)
plt.show()
|
使用scatter绘制一系列点
1
2
3
4
5
6
7
8
9
10
11
12
13
14
15
16
17
| import matplotlib.pyplot as plt
x_values = [1,2,3,4,5]
y_values = [1,4,9,16,25]
plt.scatter(x_values,y_values,s=100)
plt.title("square number",fontsize=24)
plt.xlabel("x_value",fontsize=14)
plt.ylabel("y_value",fontsize=14)
plt.tick_params(axis='both',which='major',labelsize=14)
plt.show()
|
自动计算数据
1
2
3
4
5
6
7
8
9
10
11
12
13
14
15
16
17
18
19
20
21
22
| import matplotlib.pyplot as plt
x_values = list(range(1,1001))
y_values = [x**2 for x in x_values]
plt.scatter(x_values,y_values,s=40)
plt.title("square number",fontsize=24)
plt.xlabel("x_value",fontsize=14)
plt.ylabel("y_value",fontsize=14)
plt.tick_params(axis='both',which='major',labelsize=14)
plt.axis([0,1100,0,1100000])
plt.show()
|
删除数据点的轮廓
将实参edgecolor设为none
1
| plt.scatter(x_values,y_values,edgecolor='none',s=40)
|
自定义颜色
传入参数c就行
1
| plt.scatter(x_values,y_values,c='red',edgecolor='none',s=40)
|
也可以用rgb模式给c赋值,具体颜色可以随意调节
1
| plt.scatter(x_values,y_values,c=(0,0,0.8),edgecolor='none',s=40)
|
颜色映射
人话:渐变色
1
2
3
4
5
6
7
8
9
10
11
12
13
14
15
16
17
18
19
20
21
22
| import matplotlib.pyplot as plt
x_values = list(range(1,1001))
y_values = [x**2 for x in x_values]
plt.scatter(x_values,y_values,c=y_values,cmap=plt.cm.Blues,edgecolor='none',s=40)
plt.title("square number",fontsize=24)
plt.xlabel("x_value",fontsize=14)
plt.ylabel("y_value",fontsize=14)
plt.tick_params(axis='both',which='major',labelsize=14)
plt.axis([0,1100,0,1100000])
plt.show()
|
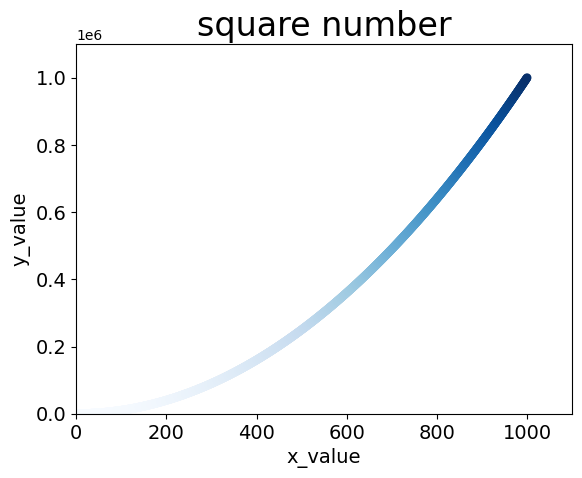
这里我们将参数c设置成y值列表,并使用参数cmp选择颜色映射看看效果:

了解更多访问http://matplotlib.org/ ,单击Examples,滚动到Color Examples,再选择colormaps_reference
自动保存图表
将plotshow()改成plot.savefig
1
| plt.savefig('squares_plot.png',bbox_inches='tight')
|
第一个参数是文件名,第二个是去除图表空白处
随机漫步
创建 RandomWalk()类
1
2
3
4
5
6
7
8
9
10
11
12
13
|
from random import choice
class RandomWalk():
"""生成随机漫步数据的类,包含两个方法"""
def __init__(self,num_points=5000):
"""初始化随机漫步属性"""
self.num_points = num_points
self.x_values = [0]
self.y_values = [0]
|
选择方向
1
2
3
4
5
6
7
8
9
10
11
12
13
14
15
16
17
18
19
20
21
22
23
24
25
| def fill_walk(self):
"""计算随机漫步包含的所有点"""
while len(self.x_values) < self.num_points:
x_direction = choice([1,-1])
x_distance = choice([0,1,2,3,4])
x_step = x_direction * x_distance
y_direction = choice([1,-1])
y_distance = choice([0,1,2,3,4])
y_step = y_direction * y_distance
if x_step == 0 and y_step == 0:
continue
next_x = self.x_values[-1] + x_step
next_y = self.y_values[-1] + y_step
self.x_values.append(next_x)
self.y_values.append(next_y)
|
绘制随机漫步
引入类绘制就行了
1
2
3
4
5
6
7
8
9
| import matplotlib.pyplot as plt
from random_walk import RandomWalk
rw = RandomWalk()
rw.fill_walk()
plt.scatter(rw.x_values,rw.y_values,s=15)
plt.show()
|
模拟多次随机漫步
加个循环就行了
1
2
3
4
5
6
7
8
9
10
11
12
13
14
15
| import matplotlib.pyplot as plt
from random_walk import RandomWalk
while True:
rw = RandomWalk()
rw.fill_walk()
plt.scatter(rw.x_values,rw.y_values,s=15)
plt.show()
keep_runing = input("是否停止随机漫步? (y/n): ")
if keep_runing == 'y':
break
|
给点着色
我们可以通过之前学的颜色渐变来表示点出现的先后顺序,也就是点的路径
1
2
3
4
5
6
7
8
9
10
11
12
13
14
15
16
17
| import matplotlib.pyplot as plt
from random_walk import RandomWalk
while True:
rw = RandomWalk()
rw.fill_walk()
point_numbers = list(range(rw.num_points))
plt.scatter(rw.x_values,rw.y_values,c=point_numbers,cmap=plt.cm.Blues,edgecolor='none',s=15)
plt.show()
keep_runing = input("是否停止随机漫步? (y/n): ")
if keep_runing == 'y':
break
|
显示起点和终点
我们可以让起点和终点变大并用不同颜色表示,这样可以让路径更加明了
1
2
3
4
5
6
7
8
9
10
11
12
13
14
15
16
17
18
19
20
21
22
| import matplotlib.pyplot as plt
from random_walk import RandomWalk
while True:
rw = RandomWalk()
rw.fill_walk()
point_numbers = list(range(rw.num_points))
plt.scatter(rw.x_values,rw.y_values,c=point_numbers,cmap=plt.cm.Blues,edgecolor='none',s=15)
plt.scatter(0,0,c='green',edgecolor='none',s=100)
plt.scatter(rw.x_values[-1],rw.y_values[-1],c='red',edgecolor='none',s=100)
plt.show()
keep_runing = input("是否停止随机漫步? (y/n): ")
if keep_runing == 'y':
break
|
看看效果:

隐藏坐标轴
我们关注的是随机漫步的路径,坐标轴多少有点碍眼,可以用一串又臭又长的方法,选false就行在《Python编程-从入门到实践》-【美】Eric Matthes 著这本书中的方法有问题,生成的图一片空白,需要先给plt.axes赋值再提前才能正常显示,可以看我下面改
1
2
3
4
5
6
7
8
9
10
11
12
13
14
15
16
17
18
19
20
21
22
23
24
25
26
| import matplotlib.pyplot as plt
from random_walk import RandomWalk
while True:
rw = RandomWalk()
rw.fill_walk()
current_axes = plt.axes()
current_axes.get_xaxis().set_visible(False)
current_axes.get_yaxis().set_visible(False)
point_numbers = list(range(rw.num_points))
plt.scatter(rw.x_values,rw.y_values,c=point_numbers,cmap=plt.cm.Blues,edgecolor='none',s=15)
plt.scatter(0,0,c='green',edgecolor='none',s=100)
plt.scatter(rw.x_values[-1],rw.y_values[-1],c='red',edgecolor='none',s=100)
plt.show()
keep_runing = input("是否停止随机漫步? (y/n): ")
if keep_runing == 'y':
break
|
隐藏之前:
隐藏:

增加点数
改个数字就行,但点变多了,点的大小也得变小,代码如下
1
2
3
4
5
6
7
8
9
10
11
12
13
14
15
16
17
18
19
20
21
22
23
24
25
26
| import matplotlib.pyplot as plt
from random_walk import RandomWalk
while True:
rw = RandomWalk(50000)
rw.fill_walk()
current_axes = plt.axes()
current_axes.get_xaxis().set_visible(False)
current_axes.get_yaxis().set_visible(False)
point_numbers = list(range(rw.num_points))
plt.scatter(rw.x_values,rw.y_values,c=point_numbers,cmap=plt.cm.Blues,edgecolor='none',s=1)
plt.scatter(0,0,c='green',edgecolor='none',s=10)
plt.scatter(rw.x_values[-1],rw.y_values[-1],c='red',edgecolor='none',s=10)
plt.show()
keep_runing = input("是否停止随机漫步? (y/n): ")
if keep_runing == 'y':
break
|
调整尺寸适应屏幕
引入figure函数即可,可以指定图标的宽度,高度,分辨率和背景色,可以用形参dpi传入分辨率,figsize传入尺寸
1
2
3
4
5
6
7
8
9
10
11
12
13
14
15
16
17
18
19
20
21
22
23
24
25
26
27
28
29
| import matplotlib.pyplot as plt
from random_walk import RandomWalk
while True:
rw = RandomWalk(50000)
rw.fill_walk()
plt.figure(dpi=128,figsize=(10,6))
current_axes = plt.axes()
current_axes.get_xaxis().set_visible(False)
current_axes.get_yaxis().set_visible(False)
point_numbers = list(range(rw.num_points))
plt.scatter(rw.x_values,rw.y_values,c=point_numbers,cmap=plt.cm.Blues,edgecolor='none',s=1)
plt.scatter(0,0,c='green',edgecolor='none',s=10)
plt.scatter(rw.x_values[-1],rw.y_values[-1],c='red',edgecolor='none',s=10)
plt.show()
keep_runing = input("是否停止随机漫步? (y/n): ")
if keep_runing == 'y':
break
|
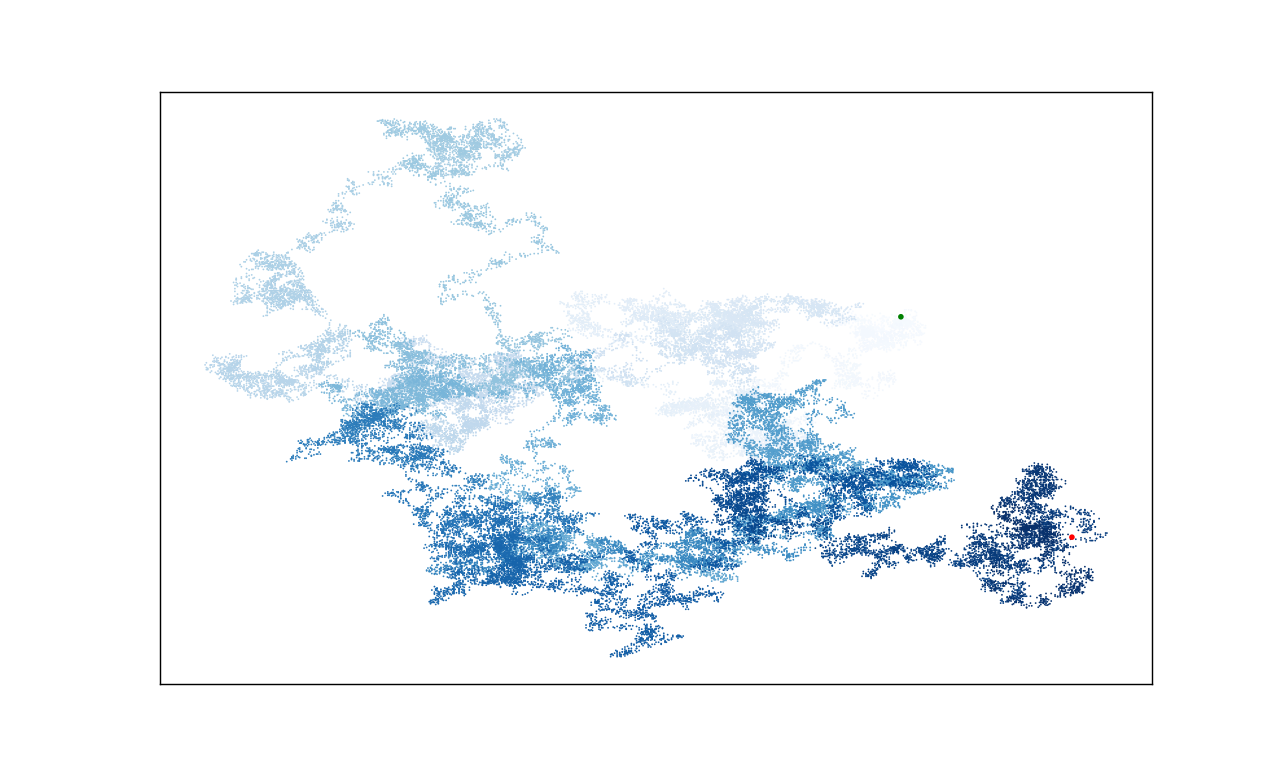
最终效果:

这又何尝不是一件艺术品


